


Here you can find the detailed instruction on how to export data from Microsoft Excel files (xlsx, xlsb, xlsm, xls) to SQLite database in Database Tour software.
Below, it is shown how to export data directly (from GUI or command line), or using clipboard.
Notes:
- The data migration from Excel to other database types like Firebird, PostgreSQL, Oracle, etc is very similar; the difference is in registering the target database.
- Similarly, you can export data to SQLite from any other database types instead of Excel; the difference is in registering the source database.
Export Conditions
In most cases, to export from Excel to SQLite, the following conditions are required:
- SQLite3.dll must be accessible.
- To open Excel files, the corresponding ODBC driver or OLE DB provider must be installed. In most cases, they are installed already. You can check this by trying to open an Excel file. Anyway, the drivers are available to download on Microsoft websites.
- Make sure all involved database components (Database Tour software, SQLite3.dll, Excel ODBC driver or OLE DB provider) have the same architecture, i.e. either all are 32-bit or all are 64-bit.
Note: On our websites, you can find both versions of Database Tour: 32-bit and 64-bit. Please check which one you are downloading. If your operating system is 64-bit, you can install both Database Tour 32-bit and Database Tour 64-bit and use them independently. Please also note that one user license covers both 32-bit and 64-bit versions.
Configuring Excel to SQLite Exporting
- Launch Database Tour.
- Register your source Excel database. It can be an .xls, .xlsx, .xlsb, or .xlsm file. See the links at the end of the topic to learn the possible options and troubleshooting.
- Register your target SQLite database. The recommended interface is FD, but other options are also available. If the target database does not exist yet, create a target SQLite file. Note: You can create and/or register the target database from the Export dialog during the exporting.
Export Steps
Exporting a Dataset
- Open the registered Excel database. Note: If you do not see the tables inside it, try these recommendations.
- Choose a dataset to export. I.e. select a table in the table list or write and execute your SQL query.
- If you chose the table, switch to Data page.
- Click Export button.
- Switch to the Database tab. If this tab is not visible, click Favorite Export Formats button in the top-right corner of the window and make sure the Database item is selected.
- Select your registered SQLite database as a target database.
- Specify a target table. Turn on the Memory saving mode option. If your source data or column names on any side contain Unicode characters, set the stream Encoding to UTF-8. Choose the correct Export mode, e.g. Replace+Insert, Append etc.
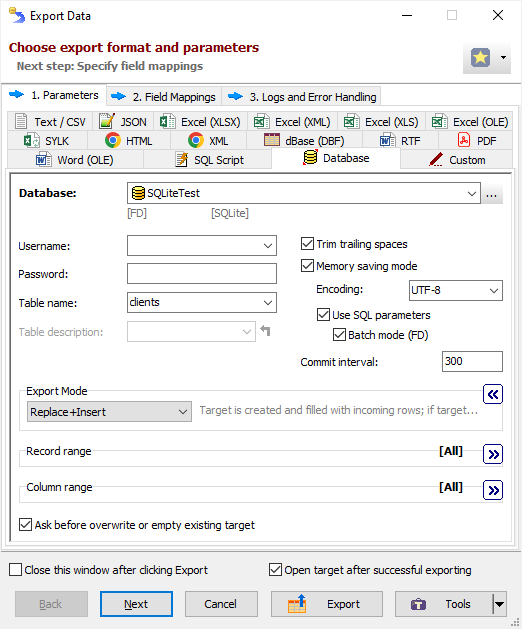
- Click Next. Check the source-to-target field mappings. Specify names, types and other attributes of target columns.
- Click Export to begin the export procedure. You can interrupt the process by pressing ESC or by clicking Cancel in additional window which is shown during the exporting process.
Exporting Multiple Tables
- Open the registered Excel database.
- Switch to the Tables tab to the left. Right-click the table list and choose Multiple Selection.
- Select tables to export.
- Click Export button.
- Switch to the Database tab and select your registered SQLite database as a target database.
- Specify export parameters:
- Turn on the Memory saving mode option and its related options. In case of exporting problems, if you suspect that they can be caused by these options, try different combinations of them.
- Choose the Export mode to be applied to the most of the tables. You can override it for specific tables at the next step. For example, it can be Replace+Insert for the most of the target tables, Update for some of the tables, Append for others etc.
- Leave the field for target table name empty. Fill it only if you need to export all source datasets to one target table.
- Click Next. Specify the source-to-target table mappings, i.e. the correspondence between the source datasets and target tables. You can also add nested field mappings for every table pair here.
- Click Export.
Note: Alternatively, you can use SQL queries instead of selected tables. Or you can use a mix of queries and tables. Just use this consequence of actions instead of steps 2 to 4:
2. Open multiple SQL windows, type SQL queries there and execute them. You can also open tables you plan to export in this batch.
3. Choose Tools | Export Data | Open Datasets... menu.
4. Choose the datasets to export and click OK.
Exporting Excel to SQLite from Command Line
Here are some examples of exporting data from an .xlsx file to SQLite database using Database Tour command line. Each command line below can be easily transformed to an action file, which can be used instead of the command line. We recommend to use action files whenever possible because they are easier to maintain and are more comfortable to work with.
Note: The command line functionality is available in Database Tour Pro.
Exporting an Excel Table to Existing SQLite Database
A command line to export a table from Excel file to existing SQLite database:
"C:\Program Files (x86)\Vitaliy Levchenko\Database Tour Pro 11\dbtour.exe" /export /ExportType=DATABASE /ExportMode=REPLACE+INSERT /IncludeMemo /MemorySaving /UseSQLParameters /UseBatchMode /Encoding=UTF-8 /SrcDBInterface=ADO /SrcDBKind=FILE /SrcDBDriver=Excel /SrcDB=C:\MyDatabases\employee.xlsx "/SrcTableName=salary$" /TrgDBInterface=FD /TrgDBKind=FILE /TrgDBDriver=SQLite /TrgDB=C:\MyDatabases\employee.db /TrgTableName=SALARY
Notes
- You can export data to a new SQLite database, creating it on the fly. Just add /CreateTargetContainer switch to your command line. With this switch, Database Tour will create the target database, if it does not exist yet.
- In the example above, field names and types in the target table will be the same as in the source table. If you want to specify other structure for the target table, you should create a field mappings file, then add it to the command line:
/FieldMappingsFile=C:\MyDatabases\Export\SalaryFieldMappings.xml
You can create such a file from Export window.
Exporting in Silent Mode
Let's improve the above example by running it in silent mode, when no windows are shown. In this mode, it is recommended to add a log file to control the exporting process:
"C:\Program Files (x86)\Vitaliy Levchenko\Database Tour Pro 11\dbtour.exe" /silent /export /ExportType=DATABASE /ExportMode=REPLACE+INSERT /IncludeMemo /MemorySaving /UseSQLParameters /UseBatchMode /Encoding=UTF-8 /SrcDBInterface=ADO /SrcDBKind=FILE /SrcDBDriver=Excel /SrcDB=C:\MyDatabases\employee.xlsx "/SrcTableName=salary$" /TrgDBInterface=FD /TrgDBKind=FILE /TrgDBDriver=SQLite /TrgDB=C:\MyDatabases\employee.db /TrgTableName=SALARY /LogFile=C:\MyDatabases\export.log
Exporting All Tables from Excel File
Exporting all tables from Excel file to existing SQLite database in silent mode:
"C:\Program Files (x86)\Vitaliy Levchenko\Database Tour Pro 11\dbtour.exe" /silent /export /ExportType=DATABASE /ExportMode=REPLACE+INSERT /IncludeMemo /MemorySaving /UseSQLParameters /UseBatchMode /Encoding=UTF-8 /SrcDBInterface=ADO /SrcDBKind=FILE /SrcDBDriver=Excel /SrcDB=C:\MyDatabases\employee.xlsx /SrcTableName=* /TrgDBInterface=FD /TrgDBKind=FILE /TrgDBDriver=SQLite /TrgDB=C:\MyDatabases\employee.db /TrgTableName=* /LogFile=C:\MyDatabases\export.log
Note: In the example above, target table names and their column names will be the same as in the source tables. If you want to override this behavior, you should create a table mappings file, then add it to the command line:
"/TableMappingsFile=C:\MyDatabases\Export\Excel-To-SQLite-Table-Mappings.xml"
You can create such a file from Export window when exporting multiple tables.
Alternative Scenario Using Generated SQL Statements
If you for some reason could not export data directly from Excel file to SQLite, Database Tour can export the Excel data to a SQL script first, and then load data into SQLite database using Database Tour or any other SQL tool. You can export data to SQL script either by GUI or from the command line.
But please note, this way, your export process will have two phases: first, exporting the data to SQL script; second, loading data from the script to your target database. So, this way can be less effective, especially for large datasets or when automating the data exporting.
Anyway, we recommend to try both scenarios and select the fastest and/or the most convenient one.
Exporting Range of Cells Using Clipboard
If something goes wrong, you still can export your data using clipboard. Use this way also if you need to export some specific rectangular cell range.
- Copy a rectangular range of cells in Excel (or another application which is able to work with Excel files).
- Launch Database Tour.
- Register your SQLite database.
- Open your registered SQLite database and a target table in it.
- Rearrange the table columns so that their order match the order of Excel columns from the copied range.
- If you want to insert the copied data as new records, click Insert Record button. Skip this step, if you wish to update existing data.
- Right-click the cell, which will be the first cell to paste data to, and choose Paste Cells from Clipboard menu.
Reusing Export Configuration
Before closing the Export window, you might want to save your export configuration for future use, in order not to repeat all the actions again.
Saving and Loading Field or Table Mappings
Sometimes, you need to reuse your changed field or table mappings, for example. For example, you overrode the default field mapping (i.e. deleted some fields, added calculated fields, changed the target field names etc), and want to save your work. You can save the field/table mappings to a file by clicking Save button (above the mapping grid). Next time, when exporting the same or similar table, you can load the mappings from that file by clicking Load button.
The created field mappings file or table mappings file can also be used in building your command line when automating the exporting process.
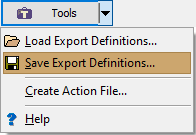
Saving and Loading Export Definitions
You can save all export definitions (including field/table mappings and other selected options) by choosing Tools | Save Export Definitions.... To load the definitions from file, choose Tools | Load Export Definitions.... Such a practice can save your time and guaranties that specified combination of options will be exactly reproduced.
See also