 Documentation


SQL Query Execution
To execute SQL statement(s), shown in SQL editor, click Execute Query button  . Note: if there is selected text in SQL editor, then only selected statement(s) will be processed.
In the drop-down list of the Execute Query button, you can choose some additional actions:
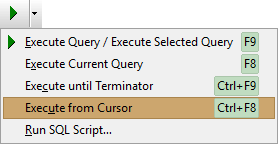
- Execute Query / Execute Selected Query - Behaves as clicking Execute Query button.
- Execute Current Query - Executes current SQL statement (i.e. the statement where the cursor is located).
- Execute until Terminator - Actual for Oracle and SQL Server databases. Executes SQL statements until SQL terminator is found; for Oracle, the terminator is a slash at the beginning of the line, and for SQL Server, it is a GO word. For other databases, the semicolon is usually used as a terminator, so execution will stop on the first semicolon.
- Execute from Cursor - Executes all SQL statements from the current cursor position to the end of file.
- Execute SQL Script... - Behaves as clicking Execute Query button, but before the execution, it asks for the file to write the execution log.
If the SELECT query was successfully executed, the result data will be shown on the Result page (or below the query text depending on the corresponding option). To work with these data, you can use some items from the Tools menu or the corresponding buttons from the main toolbar (when you on the page showing the result set). For example, you can export or print the query data etc.
To quickly build a query for selecting data from a table, you can just choose Generate SQL | Query Data... item from context menu of the needed table in the table list.
Editing SELECT query results
Some databases allow to edit the result of SELECT query, if it comply certain criteria (e.g. using only one physical table, not using aggregate functions in the SQL command etc). Additionally, you have to turn on the Use editable queries, if possible option before opening the query. After SELECT query execution, active editing buttons (Delete, Edit etc.) confirm the query was opened in edit mode.
History of executed queries and navigation between them
The application saves the SQL texts of the executed queries (their quantity specified by the corresponding option) and some statistical information about them for each SQL window of each database. This information is available on History page of the corresponding SQL window. It can be copied to clipboard, which allows to automatically create the script with all queries from the history. To exchange SQL texts between different databases, use Export SQL History and Load SQL History buttons. To quickly copy SQL texts from one database to another, open the first database, then go to History page and open the second database holding SHIFT down. To navigate between SQL texts, use the Previous SQL, Next SQL buttons on Edit page, corresponding items from the Query menu or double-click needed row on History page.
History of all SQL windows of all registered databases are saved to a workspace file (full path of the file can be seen from Database | Registered Databases... menu). This saving is done in the following cases: before executing a query, before database closing, and before the application's closing. Please consider this information when working with multiple instances of the application. When the application is restarting, all history of all SQL windows of all databases are loaded from the workspace file into operating memory; then, when certain database is opening, all its SQL windows and their history are restored.
Execution by timer
There is a possibility to execute the query by a timer. Use Execute by timer button  for that. When you click this button, the Database Tour is repeating the query execution by timer. This can be useful, for example, when you monitor the often-changed data or logs, or for testing purposes. In the drop-down list of the button, you can change the corresponding options like timer interval etc. To stop the execution cycle, just click the button again to restore its unpressed state.
See also